FMOD Studio User Manual 2.02
- Welcome to FMOD Studio
- FMOD Studio Concepts
- Organizing the Project
- Authoring Events
- Working with Instruments
- Managing Assets
- Parameters
- Getting Events into Your Game
- Mixing
- The Sandbox
- Editing During Live Update
- Profiling
- Dialogue and Localization
- Using Source Control
- Supporting Downloadable and User-generated Content
- Advanced Topics
- Quick Start Tutorial
- Effect Reference
- Event Macros Drawer Reference
- Instrument Reference
- Keyboard Shortcut Reference
- Modulator Reference
- Parameters Reference
- Plug-in Reference
- Scripting
- Scripting API Reference
- Troubleshooting
- Glossary
- Appendix: Celeste Getting Started Guide
- Appendix: Reaper Integration
8. Getting Events into Your Game
After gathering all your assets, creating your events, and adjusting your mixer settings, the next step is getting that content into your game. The process consists of assigning events to banks, building those banks, and then copying those built banks to your game.
There are several aspects to correctly building an FMOD Studio project that can impact its efficiency and overall functionality. Depending on the size and scope of your project some of these specifications may need to be planned early in development, and others can be applied when implementing your content.
FMOD Studio provides a variety of settings to ensure effective workflow and efficient performance for your game.
8.1 Banks
In order for content to be used in your it needs to be built into banks. Banks are collections of the metadata, assets, events and other content used in your project, to be built and used in your game. Your game's code calls banks and manipulates FMOD Studio events to produce sound.
FMOD Studio does not automatically assign events to banks. If you run the build process without first assigning the project's events to banks, the resulting bank files will not include those events.
To assign events to a bank, you can either right click on an event in the events browser and choose "Assign to Bank...", or you can drag the event from the events browser into the banks browser and drop it onto the bank of your choosing. Any event not assigned to a bank is tagged with #unassigned.
How you allocate events and set up your banks can significantly affect the performance and efficiency of your project. A bank needs to be loaded into memory before any events in that bank can be used. The amount of memory consumed by a bank depends on its content. There is otherwise no limit to the number of banks your project can include or to how many banks can be loaded into memory at a time.
You can view all banks and add more in the banks browser.
To create a new bank, right click in an empty space in the banks browser and select "New Bank".
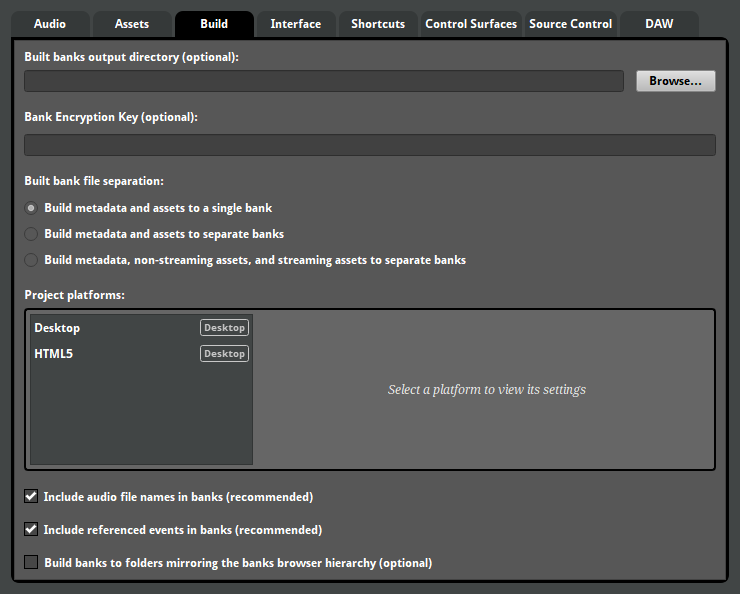
You can also create folders by right clicking in an empty space in the banks browser and selecting "New Folder". By default, placing banks into folders does not affect the build process, as all banks are built into the "Built Banks Output Directory" specified in the build tab of the preferences dialog. You can override this default behavior by checking the "Build banks to folders mirroring the banks browser hierarchy (optional)" checkbox in the build tab of the preferences dialog, which causes built banks to be placed in folders corresponding to the folders in your project's banks browser. For more information about the locations of built banks, see the what building creates section of this chapter.
Some banks are master banks, which contain data related to your project as a whole, including its mixer, buses, and VCAs. At least one master bank must be loaded into memory at all times for your game to function. By default, a newly created FMOD Studio project has one master bank.
To make a bank a master bank, right-click on the bank and select "Mark as Master Bank" from the context menu.
Assigning events to a master bank is not recommended. This is because a master bank must be loaded at all times, meaning that it is not possible to unload the bank in order to conserve memory. However, in small projects where only one bank is needed, assigning events to the master bank may be more viable.
Placing banks into folders does not affect the build process, as all banks are built into the folder specified in the build tab of the preferences dialog.
8.1.1 Including Referenced Events in Banks
By default, referenced events and their sample data are automatically assigned to the same banks as each of the events by which they are referenced. This means that a referenced event does not need to be specifically assigned to a bank before building.
You may opt to prevent referenced events from being automatically assigned to their parent events' banks. To enable this option, open the preferences dialog dialog and uncheck the "Include referenced events in banks" option in the build tab.
Enabling this option means you have to manually assign each referenced event to a bank in order to use it in game. By assigning and building a commonly used referenced event to a specific bank, the referenced event and its sample data is only built into that bank and can be used by all events referencing it. This assists with reducing the file size of built banks.
8.1.2 Building Metadata and Assets to Separate Banks
Banks can contain two types of data: Sample data and metadata. Sample data is the encoded audio assets used by the events in a bank, while metadata is every other defining feature of those events.
Your game must load both the sample data and the metadata of an event to play instances of that event. For this reason, banks contain both metadata and sample data for each of the events assigned to them by default.
It is also possible to build the metadata and sample data into separate bank files. This produces two bank files for each bank in your project. Separate metadata and sample banks require slightly more resource overhead, but can also be updated independently, allowing you to patch your game's metadata banks without including the sample data banks in the download. To build your project's metadata and sample data into separate bank files, select the "Build metadata and assets to separate banks" option under "Built bank file separation" in the build tab of the preferences dialog before building your project.
Some game engines additionally require that the sample data of streaming assets and non-streaming assets be in separate files. To build your project's metadata, streaming asset sample data and non-streaming asset sample data into separate bank files, select the "Build metadata, non-streaming assets, and streaming assets to separate banks" option under "Built bank file separation" in the build tab of the preferences dialog before building your project.
All banks are built in binary format and are not human-readable, regardless of whether they contain metadata, sample data, or both.
8.2 Platform Settings
Each platform has its own hardware and limitations to consider. For example, some consoles have a hardware audio decoder which will save on processing power, and the vast majority of handheld devices have no need for 7.1 surround sound speaker modes. FMOD Studio allows you to use one project to build to multiple platforms.
To add platforms to your builds list, right click into the "Project Platforms" list in the preferences dialog's build tab and choose the appropriate platform from the "Add Platform" list.
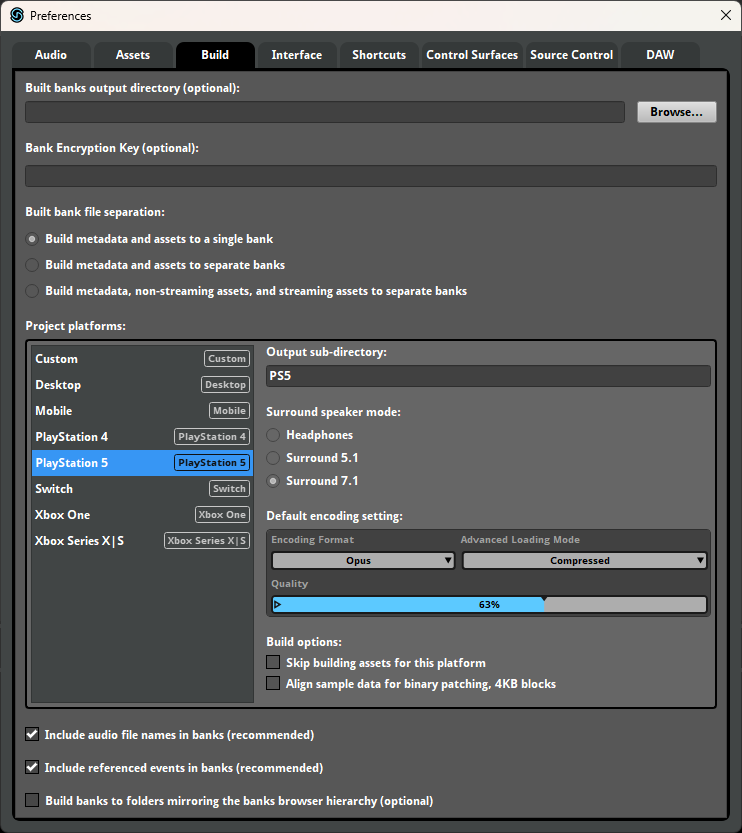
You can add the same platform to the project platforms list multiple times to represent multiple hardware types. For example, you can have two Desktop platforms, naming one as "Windows" and one as "Mac", if needed.
The surround speaker mode and output sub-directory settings must be set on a per platform basis.
If the assets and encoding settings used in two or more platforms are identical, you can save time by disabling the building of sample data for all but one of those platforms. To disable building sample data for a platform, select that platform in the project platforms list and check its "Skip building assets for this platform" checkbox.
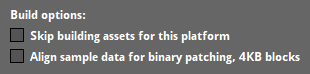
When building banks, FMOD Studio defaults to aligning assets to 32KB boundaries, as that alignment is suitable for binary patching of bank files on most platforms; however, binary patching on Xbox benefits more from data aligned to 4KB boundaries. If your game is to be released on a Microsoft console, you can check the "Align sample data for binary patching, 4KB blocks" checkbox to ensure more efficient binary patching of banks on that platform.
8.2.1 Compression and Encoding Settings
You can specify how your assets are compressed and encoded when built into your banks. This affects file sizes, load times, and performance. Compression formats are set on a per platform basis and can be overridden on a per asset basis.
You can set the default encoding setting for a platform in the preferences dialog. Under the build tab, select the desired platform in the project platforms list, then select a default encoding setting. Some platforms support special encoding formats, such as AT9 and XMA. All encoding settings other than PCM involve compression.
Below is a table showing each platform available and their recommended encoders.
| Platform | Recommended Encoder | Reason for Recommendation |
|---|---|---|
| Desktop (Windows, Mac, Linux) |
Vorbis | A good all-rounder that offers a decent compression to quality ratio. Recommended for all music files, except on platforms with hardware decoders. |
| PlayStation 5 | Opus | PS5 has a hardware decoder for the Opus and AT9 formats. Utilizing either will save on CPU cycles, but the Opus format provides better quality. |
| PlayStation 4 | AT9 | As with the PS5, PS4 has an AT9 hardware decoder that can save CPU cycles. |
| Xbox Series X|S | Opus | Xbox Series X now use Opus hardware decoding and utilizing it will save on CPU cycles. |
| Xbox One | XMA | Xbox One has a hardware decoder for the XMA format and utilizing it will save on CPU cycles. |
| Nintendo Switch | FADPCM | A lightweight codec, which is good for the Switch. |
| Mobile (Android, iOS) |
FADPCM | A lightweight codec, which is good for mobile devices. |
| Custom | Any | The 'Custom' platform permits all compression formats, and so can be used for platforms other than those listed above. |
The FADPCM and PCM encoding formats do not allow their compression amounts to be adjusted but do offer altering the sample rates from 48.0kHz to 4.0kHz. PCM is not recommended for most platforms, however it is still worth using for short sounds if FADPCM's cost is too high.
AT9 is a Sony exclusive encoding format available for PlayStation Vita and PlayStation 4. In order to build banks with assets using AT9 you need the libatrac9.dll file to be in the root of the FMOD Studio installation directory; to obtain this file, you or someone on your team with access to the PlayStation SDK Manager must select the "ATRAC9 Windows Library" package from "SDK #.### -> SDK / Development Tools -> Tools For Development (Other) -> External Tools." Building banks with assets using AT9 is only available on the 64 bit Windows version of FMOD Studio.
XMA is a Microsoft exclusive encoding format available to the Xbox 360 and the Xbox One. Building banks with assets using XMA is only available on the Windows version of FMOD Studio. Please see the documentation provided with the FMOD Engine for Xbox 360 and Xbox One installations for further information.
Opus is an encoding format supported by some platforms. Consult your target platforms' specifications to determine whether they support Opus.
The AT9, Opus, XMA, and Vorbis encoding formats offer a "Quality" slider that allows you to control the amount of compression used when building. Please note that even though the quality slider represents quality in percentages, the actual compression ratio of some encoders will be fixed within a certain range. For example, AT9 encoding won't have any difference in compression ratio when the quality slider is set between 40% and 48%. You can see how FMOD Studio determines compression ratios below:
- Vorbis - Vorbis quality maps linearly to FMOD Studio's quality slider 1% to 100%. It defaults to 37%, as recommended by Vorbis for the best balance between compression and quality.
- AT9 - Bitrate (Kbps) depends on channel count, quality slider 1% to 100% steps up every 16%. For more information see the FMOD FSBank section of the FMOD Engine User Manual.
- Opus - Opus per-channel bitrates of 0.8 Kbps to 64 Kbps map linearly to the range 1% to 80% on FMOD Studio's quality slider, and per-channel bitrates of 67.2 Kbps to 128 Kbps map linearly to the range of 81% to 100%. Opus quality defaults to 63%, which corresponds to the bitrate of 50.4 Kbps used by default in the Opus reference implementation.
- XMA - XMA quality maps linearly to FMOD Studio's quality slider.
For information on how to override encoding settings on a per asset basis, please see the managing assets section.
8.3 Building the Project
Once all the events have been assigned to the relevant banks and all build settings have been defined as needed, you can build the project. Building gathers all the metadata, events, audio tables (and their keys), and assets of your project and bundles them into easy-to-transfer bank files. These bank files are what the FMOD Engine reads to produce audio.
To build, select "Build..." or "Build All Platforms..." from the "File" menu. "Build..." only builds for the selected platform. "Build All Platforms..." builds banks for all the platforms in the project platforms list.
You can also right click on a bank in the bank browser and choose "Build..." from there. This will build only this bank to the selected platform.
The time it takes to build banks may vary, depending on their assets, target platforms, compression and encoding settings, and build cache, as well as on whether both the metadata and sample data are being built or just the metadata.
8.4 What Building Creates
If the "Build metadata and assets to a single bank" option is selected in the build tab of the preferences dialog, every bank is built into a .bank file. Each .bank file contains the metadata and sample data for the events assigned to that bank.
If the "Build metadata and assets to separate banks" option is selected, every bank is built into a .bank file and an .assets.bank file. Each .bank file contains the metadata for the events assigned to that bank, and each .assets.bank file contains the sample data for the events assigned to that bank.
If the "Build metadata, non-streaming assets, and streaming assets to separate banks" option is selected, every bank is built into a .bank file, an .assets.bank file, and a .streams.bank file. Each .bank file contains the metadata for the events assigned to that bank, each .assets.bank file contains the non-streaming sample data for the events assigned to that bank, and each .streams.bank file contains the streaming sample data for the events assigned to that bank.
In addition, building a master bank produces a .strings.bank file that contains the name, path, and GUID of every event in the project, as well as each bank's folder path. While a .strings.bank file is not compulsory for loading sounds into a game, it contains all of the paths for events in the project. Without it, you can only look up events via their GUIDs, which may not suit your workflow.
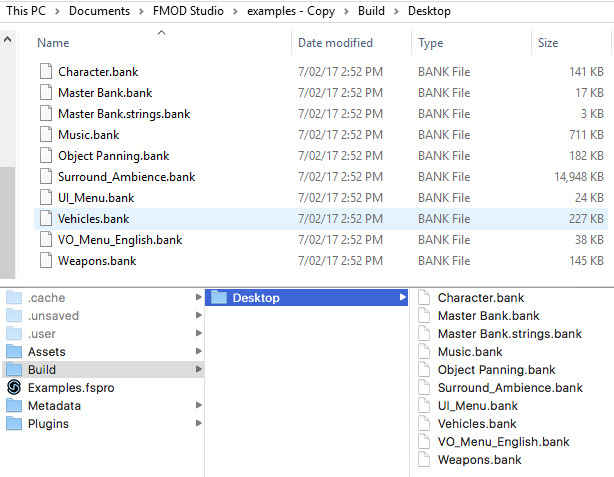
In the above screenshot, you can see each bank from the FMOD Studio example project is built into a .bank file, along with Master.bank and a Master.strings.bank file.
Bank files are what your game uses to produce audio. Once built, they no longer require FMOD Studio to function, and are ready to be added to your game.
By using the Unity integration, Unreal Engine integration, or Studio::System::loadBankFile API call your game will load the bank and give you access to all events assigned to that bank. After loading, you can play events assigned to that bank.
Master banks contain all the metadata, mixer, and routing data of your project. At least one master bank must be loaded into memory at all times while your game runs.
You do not need to assign events to master banks.
The files created when you build your project are automatically placed in your project's built banks output directory, as set in the build tab of the preferences dialog. If no built banks output directory is specified, they are created in the "Build" subfolder of your FMOD Studio project folder.
Within this folder, built .bank files are organized into subfolders named after the platforms for which they are intended. In addition, if the "Build banks to folders mirroring the banks browser hierarchy" checkbox in the build tab of the preferences dialog is checked, the built .bank files are placed inside subfolders corresponding to the folders in your project's banks browser, within the folders for each platform.
Banks built in FMOD Studio can be loaded by any version of the FMOD Engine that shares the same major and product version numbers as the copy of FMOD Studio used to create those banks, as well as by all later versions. For example, A bank built in FMOD Studio 2.00.03 can be loaded in FMOD Engine version 2.00.00 and all later versions, but not in earlier versions.
8.5 Playing Events
After building the banks and loading them into your game, it is now time to play events.
8.5.1 Playing Events in Unity
When using the FMOD Unity Integration plugin, there are two ways to play events.
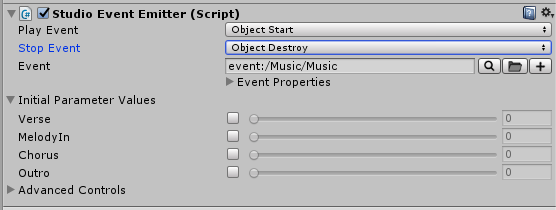
The first way is to add an FMOD Event Emitter component to a game object, choosing the event to play, and when to play it.
The second way is to use the FMOD Unity API to call events from code.
8.5.2 Playing Events in Unreal Engine
When using the FMOD for Unreal Engine Integration plugin, there are several ways to play events.
The first way is to drag and drop an event from the Content Browser into a scene Viewport.
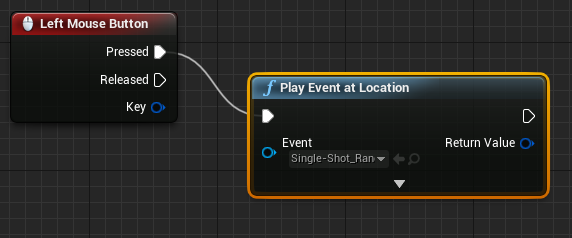
The second way is to use the "Play Event at Location" function in Blueprints to trigger any given event.
For more information on both of these methods, see the FMOD for Unreal Engine Integration documentation.
The third way is to use the FMOD for Unreal Engine API to call events from code.
8.5.3 Playing Events via the FMOD Studio API
In order to play events through the FMOD Studio API, you will need to create an event instance and then instruct it to start.
system->getEvent("event:/UI/Cancel", &cancelDescription);
cancelDescription->createInstance(&cancelInstance);

cancelInstance->start();
cancelInstance->stop(FMOD_STUDIO_STOP_ALLOWFADEOUT);
For more information, please see the Studio API Guide chapter of the FMOD Engine User Manual.